AN-18
Motherboard Layout Guidelines for Power Op Amps
Power Amp Design
Synopsis: The article targets several high priority goals in the layout of motherboards to support power operational amplifier application circuits. PCB designers who follow the suggestions are assured that the power op amp circuits will perform to their maximum capability.
In all high performance electronic circuits the physical layout of the circuit is of paramount importance. This is no less true in power op amp circuits where small input signals and high voltage, high current output signals exist side by side. Fortunately, if a few simple suggestions are followed a successful application circuit layout is assured.
The first step in assuring that a good motherboard layout is achieved actually involves the power op amp itself. At Power Amp Design the motherboard layout is considered when the amplifier model is in development. The pin-out
of the amplifier is arranged to help the motherboard designer achieve a good layout.
One way to illustrate the salient features of a good layout design is to examine any of the evaluation kit PCB’s available for Power Amp Design amplifiers. In this application note we will point out the main features of a good layout design by looking at the PCB for the EVAL118 evaluation kit for the PAD118 High Power Operational Amplifier. The top and bottom views of the PCB are shown below in Figure 1 and Figure 2. The major PCB layout design features are high-lighted below.
PCB Material
The EVAL118 PCB design is a double layer board. A double sided PCB design is necessary to provide the shortest runs to the amplifier pins. Short runs are necessary to lower land pattern resistance and other PCB parasitic effects that might cause local oscillations in the amplifier. It cannot be seen in the illustrations but 2 oz. copper is always used in evaluation board designs to handle the large currents available from the power op amps.
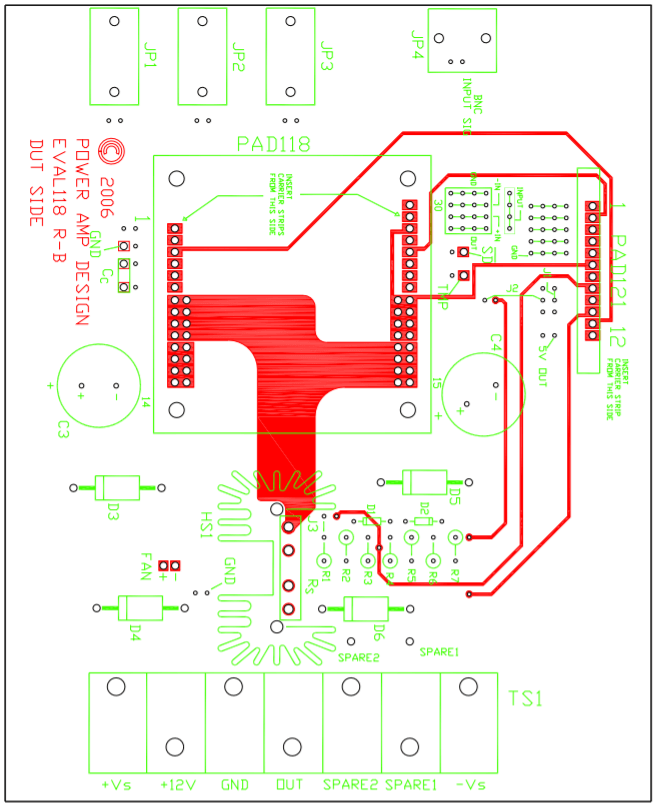
EVAL118 PCB TOP SIDE
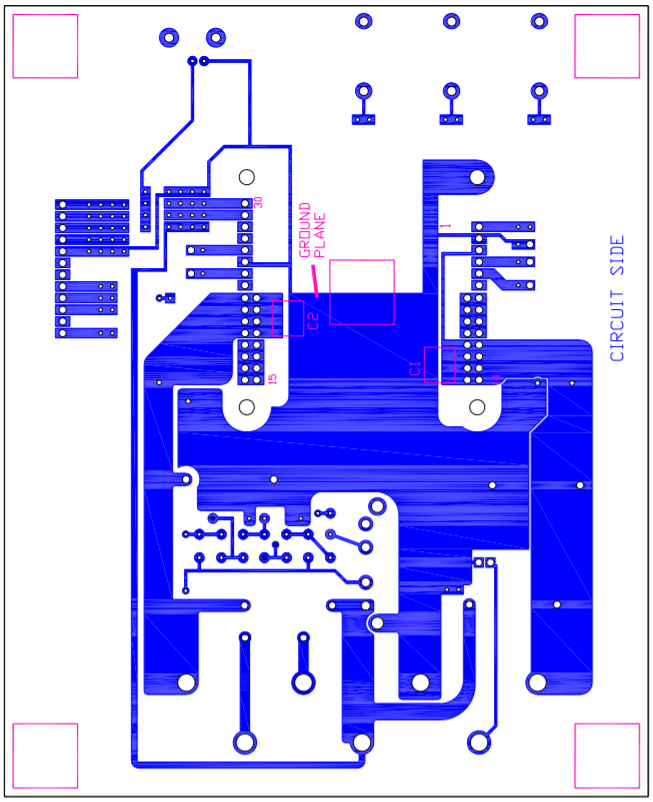
EVAL118 PCB BOTTOM SIDE
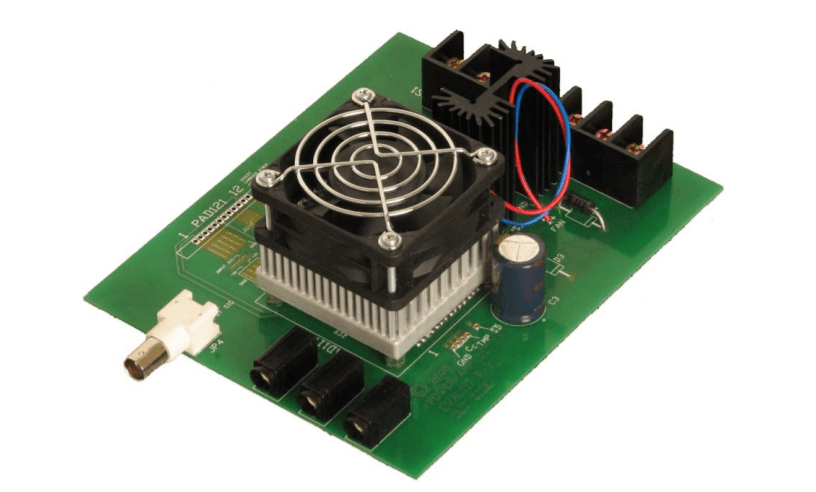
Assembled Evaluation Kit with Amplifier
Power Supply Bypassing
Proper power supply bypassing for power op amp circuits is essential and perhaps the most critical of all the layout design considerations. There are three aspects to proper power supply bypassing: bypass capacitor location, value and type.
The target of power supply bypassing is the power op amp power supply pins and closer the bypass capacitors to the power pins the better. You can see in Figure 1 and Figure 2 that the capacitors C1-C4 are physically close to the power supply pins 11-14 and 19-22. Often, in articles about bypassing, it is mentioned that the bypass capacitors should be as close as possible to the power supply pins of the amplifier. But to one person “close as possible” might be 12 inches and to another person 1 inch. When the location of the bypass capacitors is not given top priority they might well end up far removed from the amplifier and under those conditions that location may be “as close as possible”. But this is not acceptable. In this article “as close as possible” means the location of the bypass capacitors is given top priority and is one of the first things done. The bypass capacitors are located as close to the power supply pins as is physically possible due to the physical dimensions of the capacitors and manufacturing mechanical tolerances necessary to build the product.
The role of the bypass capacitors is two-fold. First, the bypass capacitors provide a solid high frequency AC ground at the power supply pins of the power op amp. The solid high frequency AC ground at this physical point minimizes the possibility that parasitic wiring inductance and capacitance might form an oscillator with the amplifier output stage components. Secondly, as the amplifier supplies output current the power supply voltage may droop due to the inductance and resistance of the power supply to amplifier connection. The amplifier cannot reject all the power supply voltage wiggle and consequently some fraction of the power supply voltage wiggle will appear at the output of the amplifier. This power supply wiggle is a lower frequency component within the power bandwidth of the amplifier.
Two types of capacitors are needed to address these two similar but separate issues. Looking at the bottom of the PCB in Fig. 2 you will find that establishing a solid high frequency AC ground is performed by the chip capacitors at C1 and C2. The chip capacitors are ceramic X7R type capacitors. An X7R capacitor provides excellent low AC impedance, low self inductance and temperature stability. Power Amp Design supplies 1uF, 200V X7R chip capacitors in evaluation kits for high power op amps like the PAD117 and P118, and .2uF 500V X7R chip capacitors for high voltage products like the PAD113.
On the top side of the PCB (Figure 1) you will find C3 and C4. These capacitors are aluminum electrolytic capacitors and their function is to reduce power supply droop at the power pins of the amplifier while that amplifier supplies AC output current to the load. Many power op amps are fast enough to supply AC current to the load faster than that AC current can be delivered through the inductance of the power supply wiring to the amplifier. In value, usually the larger the capacitance the better but a good rule of thumb is to size the electrolytic capacitor at 10uF to 20uF per amp of the expected load current. The AC ripple tolerance characteristics of the electrolytic are also important since there will be significant current ripple in the capacitor. Choose aluminum electrolytic capacitors that have the lowest self inductance. The larger the capacitance value the smaller the voltage ripple will be and the longer the electrolytic capacitor is likely to last.
As an aside, it should be noted that good power supply bypassing cannot be ignored even in low frequency power op amp application circuits. The amplifiers themselves have small signal bandwidths into the MHz region and, additionally, improper bypassing can result in a parasitic oscillation in the output stage with a frequency of 10-200MHz.
As an aside, it should be noted that good power supply bypassing cannot be ignored even in low frequency power op amp application circuits. The amplifiers themselves have small signal bandwidths into the MHz region and, additionally, improper bypassing can result in a parasitic oscillation in the output stage with a frequency of 10-200MHz.
Ground System
The ground plane can be seen in Figure 2 on the bottom of the PCB. There are several important features of the ground system. The load current does not return to the power supplies through the ground plane. The load current only flows in the ground terminal of TS1. This approach avoids a ground loop which may affect the inputs to the power op amp, the non-inverting input of which is often grounded. The only significant current that flows in the ground plane is the ripple current of the bypass capacitors.
In power circuits it is best to use a single point ground system. In the PCB layout design a single physical point is established to which all points in the complete circuit that return any significant current are tied to single physical point. All voltage measurements are no referred to this point. In a power op amp circuit the input signals are referred to this point. Signal input and the non-inverting input to the amplifier are referred to this point and this helps insure that the output is free of ripple due to ground loops in the circuit layout. The ground plane of the EVAL118 can be viewed as one leg of the star even though it is spread out over a large area of the board. In the EVAL118 the ground pin of TS1 can be viewed at that single point ground.
General Layout Features
Several of the important features of the layout of the EVAL118 are what you don’t see. For example, although there are many plated-through holes none of the plating of the plated-through holes conducts any significant current. The current in most of the plated-through holes is conducted by the cage jacks inserted into the plated-through holes. In the other case, at the current limit sense resistor, the current is conducted by the pin of the current limit sense resistor. Additionally, by careful layout and the use of the double-sided board there are no conductors routed between amplifier pins.
Recap of Layout Design Rules
The salient features of a good layout for power op amps are summarized by these points:
- Use a double sided board design with 2 oz. copper foil.
- Both high frequency (ceramic, X7R) and low frequency (aluminum electrolytic) bypass capacitors are placed as close to the power supply pins of the amplifier as the physical dimensions of the capacitors and other manufacturing tolerances will allow
- Connect the power supplies to the amplifier on the bottom of the board and the output connections on the top of the PCB. This step best organizes power input and signal output.
- Wide circuit traces lower land pattern resistance and inductance. This is especially important in the high current area of the layout design, at the power supply inputs to the amplifier and the amplifier’s output.
- Construct a ground plane that does not conduct any significant current in the center area on the bottom of the PCB. The only significant current in the ground plane should be the ripple current from the power supply bypass capacitors. Make the amplifier’s ground plane one leg of a star pattern single point ground system for the overall application circuit.
Following the salient layout features of any of the evaluation kit PCBs offered by Power Amp Design take good advantage of the field experience gained over the years with power op amp applications and will, no doubt, result in a successful power op amp layout for any application.